
 Woohoo, I finally have my Profile Design Lightning Stryke installed on my 2005 Scott CR1 Team, and headed out for my weekend 2 hr ride yesterday. I couldn't find much useful information on this clip-on bar in the Web, nor could I find pictures of it actually installed on a bike, much less a road bike, so I have taken the liberty to include lotsa pictures. The short of it is that I found them to be comfortable and fast, and got it dialed up just right after a few quick stops for minor adjustments. In case anyone is wondering about the red bar tape, I was too cheap to buy an entire roll just to tape up the bar ends, so I ended up with used bar tape at the LBS. Would have prefered white (to match the rest of the bike), but the wallet prevailed. :-)
When it comes to using clip-on aero bars on a road bike (with a drop bar), I think I am one of many who have learnt things the hard way. There just is not a whole lot of relevant information about how to choose a clip-on bar, and what works best on a road bike with drop bars. Road bikes tend to have longer top tubes, which makes mounting a clip-on bar tricky. My previous Deda Clip-One looked good and worked great, except for 2 problems:
 The elbow rests are mounted on top of the drop bar, which meant very little fore-aft positioning of the elbow rests are possible. This can be a problem especially on road bikes because the long top tube may put the elbow rests (on top of the flats of the top bars) too far away from you, which results in a "stretched" position when you are in full aero tuck. [Read: Tired neck, shoulders and back after a couple of hours in aero position.] The picture on the right is what my Deda Clip-One looked like mounted on my bike, compare it with the pictures below of the new Lightning Styke clip-on bar.
 - The Clip-One comes in two sizes (26.0 or 31.7mm diameter handlebars), this means that if (as in my case) your handlebars have 31mm shoulders that taper to 26mm, you need to fashion your own "adapter" (in my case, used MTB handle grips).
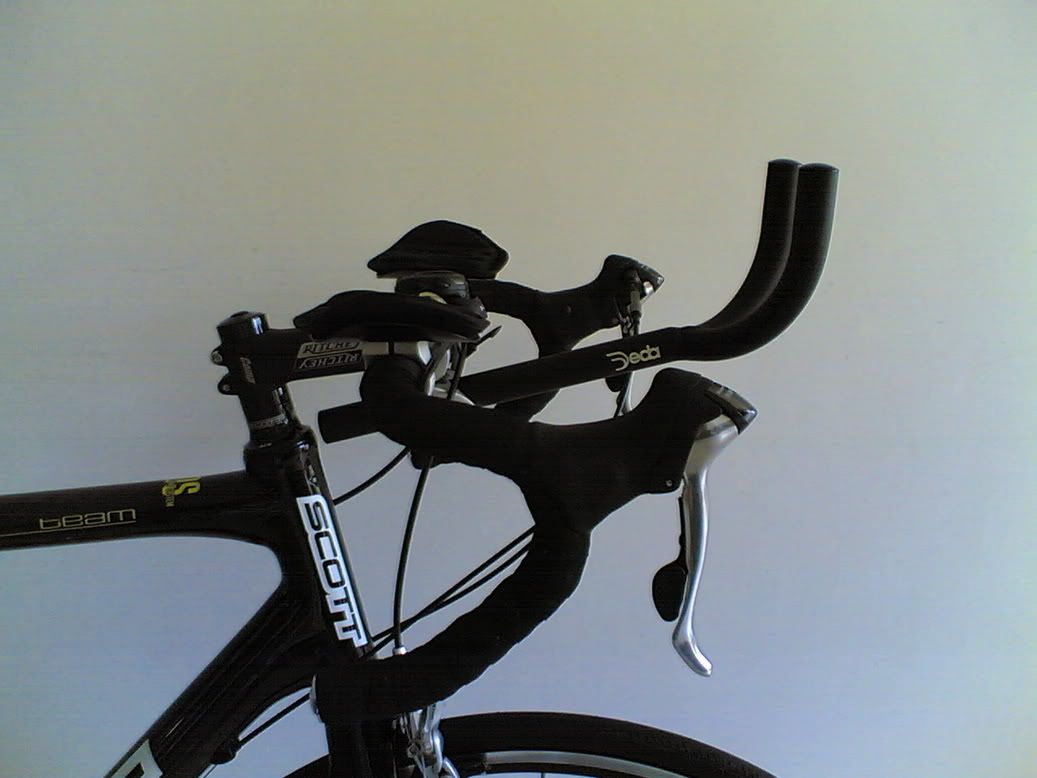
 If you look carefully at the picture on the right, you will notice that the Profile Design Ligthtning Styke solves the above 2 problems for me, because it mounts on the stem and not the base bar. This means that: (1) I can position the elbow pads much nearer to me (which mitigates the longer top tube on a road bike), and (2) I don't have to worry that my drop bar has 31mm shoulders that taper to 26mm.
The Lightning Stryke also comes with pretty high spacers to raise the elbow rests above the base bar, so if you decide to use them (as I did in the picture above), much of the flats of the base bar becomes accessible. I.e. now I can also grip the flats of my drop bar in case I need to sit a little more upright in climbs or just to ease my aging back. :-) With the Deda Clip-One, the elbow rests mounted onto the flats on the base bar itself, which means I had to hold onto the elbow rests instead of the flats if I want to sit upright. That always made me feel a little odd (especially since I have difficulty getting the elbow rests mounted securely despite my home made "adapters" - see previous paragraph).
Perhaps one last nugget of information before I let the pictures do the talking. The Lightning Stryke comes with 2 choices for how far apart the elbow rests are. This is certainly more restrictive than the Deda Clip-One simply because you can mount the elbow rests anywhere on the flats of the base bar. I found that even the widest setting for the elbow rests were more narrow than where I had my Deda Clip-One elbow rests, but even this ol' body adjusted to that pretty quickly. I used to have my elbows outside of my knees with the Deda Clip-One, and now my elbows are aligned pretty much straight on with my knees. This means that even though technically I can set the Lightning Stryke elbow rests much nearer to me (by using the 6 available fore-art positions), I had to reach a compromise position so that (1) my knees don't knock into my elbows when I am seated, and (2) my knees don't knock into the elbow rests when I am "stomping" out of the saddle. As you can see from the pictures above, I still ended up 2 inches nearer, which goes a long way toward mitigating for the longer tube tube of a road bike.


9 comments:
i have some old used black bar tape at home - you wanna?
Too Cool! Yes please.
Actually the red matches the red button on my Polar. :-))
You have a "Scott"? My fiance's name is Scott and I'm trying to justify needing a Scott road bike so I'll have his name on it when training and racing :) I guess it would be cheaper to buy a scott decal ;) Nice pictures!
heh... heh... Scott actually makes good bikes and are reasonably priced too (compared to "big" brands like Trek and Giant).
Looking at your pictures makes me realize how little I know about bikes. (Good thing I'm not a triathlete - huh?)
Enjoy it!
I must agree with Annette. I know very little about bikes, but I can appreciate the pictures and your excitment all the same.
It's all over my head. LOL.
Like you I found the profile design website weak on real application pictures. Thanks for the pictures and I think I will uses these bars on my next tri. However, what about the flip-up arm pad version? Do think that would give me easier access to the flat part of the drop bar? Also, will this mount on any stem? Gil gillonblank@gmail.com
I was about to go with this system. It looks like your stem is set to 80 or so degrees. Is that right? the bummer about this system is that it looks like if you use a 90 or 100 degree stem your pads are not level. I need a 100 degree stem on my current setup.
Post a Comment